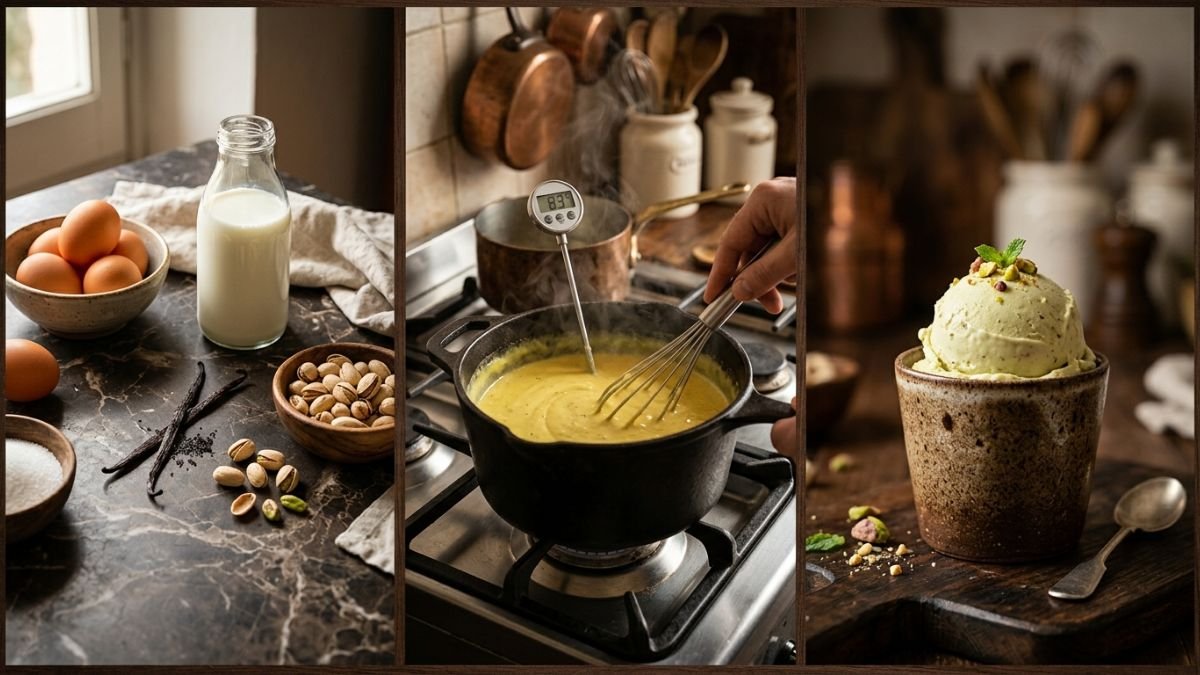
How to Make Gelato at Home: A Step-by-Step Guide for Beginners
Real Italian gelato is not complicated to make. It just requires understanding why it behaves the way it does.
Every year, millions of travellers return from Italy having tasted gelato that bore almost no resemblance to what they had previously assumed ice cream could taste like — denser, more intensely flavoured, with a texture that feels simultaneously substantial and delicate. They go looking for the same experience at home and find that what their local supermarket sells under the name “gelato” is, in almost every case, simply rebranded ice cream.
We have tested this recipe framework extensively — through multiple iterations of the base custard, across different fat ratios, with and without a machine, and across the full range of classic Italian flavours. What follows is the most reliable path to authentic homemade gelato we have found, explained in terms of the underlying principles so that you understand not just what to do, but why each step matters.
If you have ever wondered how to make gelato at home and whether the result is worth the effort — the short answer is yes, significantly, and by the third batch you will have a technique that produces results genuinely comparable to good Italian artisan gelato.
Why Gelato Tastes Different: The Three Fundamental Differences
Understanding what separates gelato from ice cream is not optional background knowledge — it is the information that will determine every decision you make in the kitchen. Get these three principles right and your gelato will taste right. Ignore them and you will produce a good frozen dessert, but not a genuine gelato.
1. Fat content: less is more flavourful
Ice cream is built on heavy cream and typically contains between 10 and 20 percent butterfat. Gelato uses whole milk as its primary base, with cream added in much smaller quantities, resulting in a fat content of roughly 4 to 9 percent. This is not a compromise — it is a design decision. Fat coats the tongue and mutes flavour. With less fat present, the pistachio, the chocolate, or the strawberry comes through with full intensity rather than being softened and rounded by cream.
2. Air content (overrun): density is texture
Ice cream is churned aggressively to incorporate air — sometimes up to 50 percent of its final volume is air. Gelato is churned slowly and contains approximately 20 to 30 percent air. That difference is what you feel on the spoon. Gelato is dense, weighty, and substantive. Ice cream is light and airy by comparison. When you make gelato at home, churning speed matters: slower is better.
3. Serving temperature: soft by design
Gelato is served at around -11°C (12°F), significantly warmer than the -18°C (0°F) typical for ice cream. This is why artisan gelato is soft enough to scoop effortlessly and melts quickly and evenly on the tongue. It is also why domestic freezers — generally set at -18°C — make homemade gelato rock-hard. The solution is simple: transfer your gelato from the freezer to the refrigerator for 10 to 15 minutes before serving.
Gelato vs Ice Cream: Key Differences at a Glance
| Factor | Gelato | Ice Cream |
| Fat content | 4–9% (mostly milk) | 10–20% (heavy cream) |
| Air (overrun) | 20–30% | Up to 50% |
| Serving temp | -11°C / 12°F | -18°C / 0°F |
| Texture | Dense, silky, substantial | Light, airy, fluffy |
| Flavour intensity | High — fat doesn’t mask it | Softer — cream rounds flavour |
Equipment: What You Actually Need
The equipment list for making gelato at home is shorter than most people expect. Here is what is essential, what is useful, and what you can skip entirely:
Essential: a heavy-bottomed saucepan
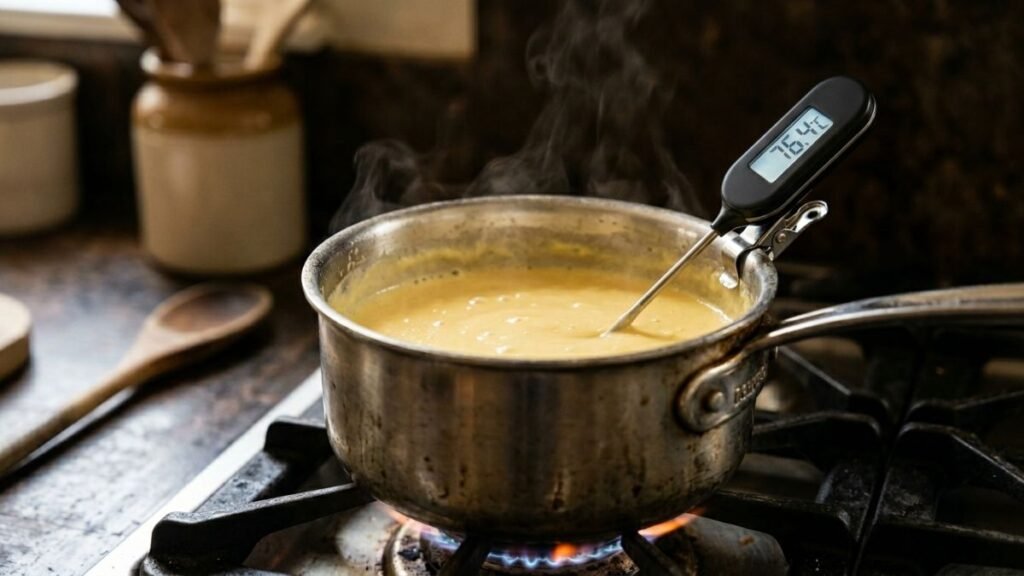
The gelato base is a cooked custard, and thin or poorly-conducting pans create hot spots that scramble eggs or scorch milk. A heavy stainless steel or enamelled saucepan is the single most important piece of equipment in the process. If you already have a good saucepan for making sauces or soups, it will work perfectly.
Essential: a kitchen thermometer
The custard base must reach between 82 and 85°C (180 to 185°F) to pasteurise the eggs and achieve the right consistency. Below 82°C and the custard will be too thin; above 85°C and the eggs begin to scramble. A digital instant-read thermometer removes this uncertainty entirely and costs between 10 and 20 euros. It is the best single investment you can make for gelato production.
Recommended: a gelato or ice cream machine
A machine churns the mixture slowly while freezing it, incorporating the right amount of air and preventing large ice crystals. The result is noticeably smoother and more authentically textured than the no-churn method. That said, very good gelato can be made without a machine — the no-churn method is detailed later in this guide — and a machine is not a prerequisite for starting.
Essential: a flat, shallow storage container
A shallow container (like a standard food storage box approximately 20 x 30cm) freezes gelato more evenly than a deep bowl, giving more surface area for the cold to penetrate. A tight-fitting lid prevents freezer odours and ice crystal formation on the surface.
Practical Tip: If you do not own an ice cream machine and want to test the process before investing in one, start with the no-churn method described below. After your first successful batch, you will have a much clearer sense of whether a machine is worth adding to your kitchen.
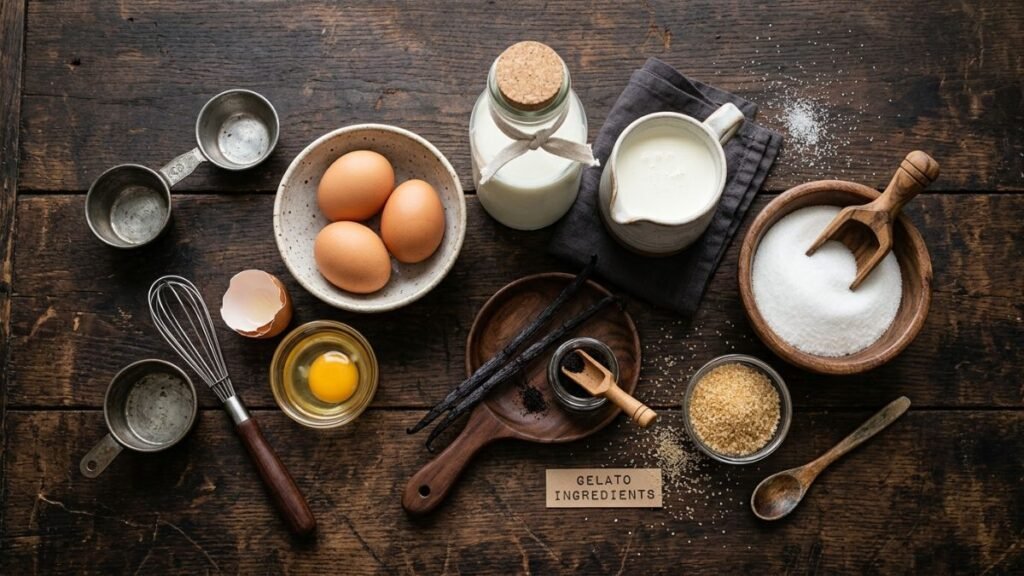
Ingredients: Keeping It Short and High Quality
One of the most important principles in Italian artisan gelato production is ingredient minimalism. Every element on the list is there because it serves a specific purpose. Nothing is there as filler or cost reduction. When you learn how to make gelato at home properly, you quickly understand that the quality of your results is determined almost entirely by the quality of what you put in:
- Whole milk — the primary base. Use the best quality you can source. Full-fat, fresh, non-UHT milk produces a noticeably better result. The flavour difference between standard and premium milk is amplified in gelato because the milk is the dominant ingredient.
- Fresh egg yolks — for richness, structure, and the characteristic deep colour of cream-based flavours. They also act as a natural emulsifier, helping to bind the fat and water in the milk into a stable, smooth base.
- White sugar — standard granulated sugar works well. Some professional recipes replace a small portion (around 20 percent) with dextrose, which lowers the freezing point slightly and produces a softer texture — useful if your freezer runs particularly cold.
- Heavy cream — used in smaller amounts than in ice cream, to add body without overwhelming the milk. The ratio of milk to cream is typically 4:1, sometimes 5:1.
- Flavour base — this is where the recipe becomes specific to each gelato: a split vanilla bean, pure pistachio paste, ripe seasonal fruit, or high-percentage dark chocolate. Use the best version of this ingredient you can access. Artificial flavourings, powdered gelato mixes, and stabiliser packets all produce detectably inferior results.
One principle worth emphasising: the gelato base has nowhere to hide a substandard ingredient. There is no heavy cream to mask an average milk, no added sugar to compensate for a mediocre chocolate. Quality ingredients are not optional — they are the recipe.
The Classic Gelato Base: Full Recipe and Method
This custard base underlies the majority of cream-based Italian gelato flavours. Master it once and you can produce an almost unlimited range of variations. The recipe makes approximately 500ml of finished gelato.
Ingredients
- 500ml (2 cups) whole milk
- 120ml (½ cup) heavy cream
- 4 large egg yolks
- 150g (¾ cup) white sugar
- 1 vanilla bean, split and scraped (or 1 tsp pure vanilla extract as a fallback)
Method
- Heat the milk, cream, and vanilla in your heavy-bottomed saucepan over medium heat. Bring to just below a simmer — small bubbles should be forming around the edges of the pan, but the surface should not be breaking. Remove from heat.
- Whisk the egg yolks and sugar in a separate bowl until the mixture turns pale, thick, and slightly increased in volume — around 2 to 3 minutes by hand. This step is called sbiancare le uova (whitening the eggs) in Italian and it is not optional. Under-whisked yolks will scramble when hot liquid hits them.
- Temper the eggs by slowly pouring a ladleful (about 80ml) of the hot milk into the egg mixture, whisking constantly. This gradually raises the temperature of the eggs without shocking them. Then pour the tempered egg mixture back into the saucepan containing the remaining milk.
- Return the saucepan to low-medium heat and stir continuously with a wooden spoon or silicone spatula, making sure to reach the edges and base of the pan. The mixture will gradually thicken over 8 to 12 minutes. Use your thermometer to monitor: target 82 to 85°C (180 to 185°F). At the correct temperature, the custard should coat the back of the spoon — drag your finger across it and the line should hold cleanly.
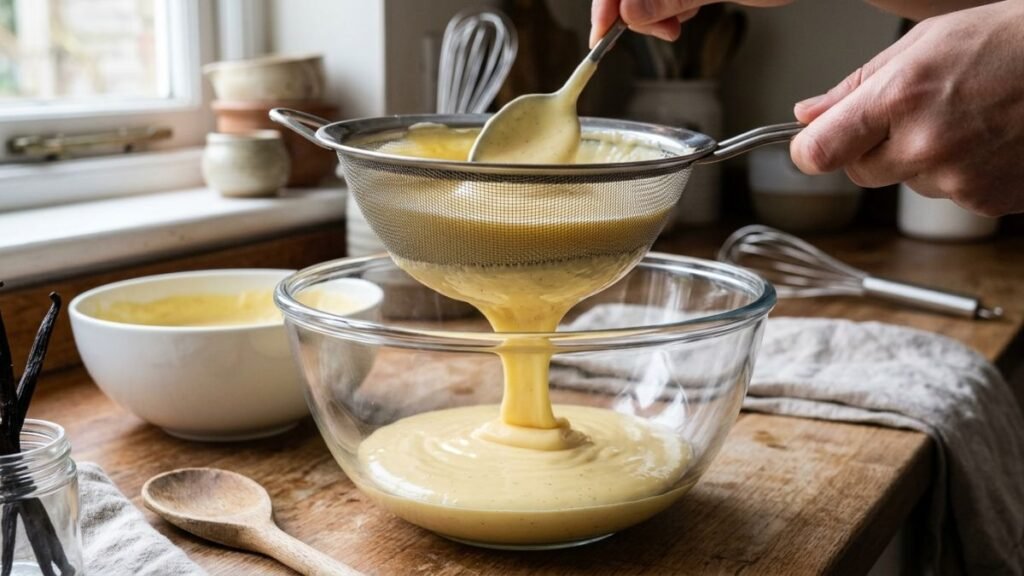
- Remove from heat immediately and strain through a fine-mesh sieve into a clean bowl. This removes any small cooked egg particles, the vanilla pod, and ensures a perfectly smooth base.
- Cool the custard rapidly by placing the bowl in a larger bowl of ice water and stirring occasionally until it reaches room temperature. Then press plastic wrap directly onto the surface (to prevent a skin from forming), and refrigerate for a minimum of 4 hours — overnight is better.
- Churn in your ice cream or gelato machine according to the manufacturer’s instructions, typically 20 to 30 minutes, until the texture resembles thick soft-serve. Transfer to your shallow container, smooth the surface, press plastic wrap directly onto it, and freeze for at least 2 hours before serving.
Important: The most common mistake is overheating the custard. Above 85°C, the egg proteins begin to coagulate and scramble. If you see small egg particles forming on the surface, remove the pan from heat immediately and strain without delay — the damage can often be partially salvaged. Prevention is always better: keep the heat low and do not leave the pan unattended once the mixture has been combined.
How to Make Gelato at Home Without a Machine
The no-churn method requires more active time but produces genuinely good results, particularly for chocolate and nut-based flavours where the texture tolerates slight crystallisation better than delicate fruit flavours.
- Follow the custard recipe through step 6. Once fully chilled, pour into your flat, shallow container and place in the freezer.
- After 45 minutes, remove and stir vigorously with a fork or hand mixer, breaking up the ice crystals that have begun to form around the edges. Return to the freezer.
- Repeat the stirring every 30 to 45 minutes for three to four additional rounds. Each pass breaks up ice crystals and moves you progressively toward a smoother result.
- After the final stir, smooth the surface, cover tightly, and freeze for at least 3 hours. The texture will be slightly more granular than machine-churned gelato — this is expected and not a failure. The flavour will be just as authentic.
Classic Italian Flavour Variations
Once you have the base recipe down, adapting it to classic Italian flavours is a matter of simple additions or substitutions.
Cioccolato Fondente (Dark Chocolate)
Add 80g of finely chopped dark chocolate (70 percent cacao or above) to the hot custard immediately after removing it from the heat in step 5, before straining. Stir until completely melted and incorporated, then strain as usual. Use the highest-quality chocolate you can find — the gelato will taste precisely as good as the chocolate you put into it.
Pistacchio di Bronte (Pistachio)
Stir 3 tablespoons of pure pistachio paste into the warm custard before the chilling step. If you can source Sicilian Bronte pistachio paste — the variety grown in the volcanic soil near Mount Etna — the result will taste unmistakably Italian. Avoid pastes with added sugar, oil, or emulsifiers. Pure pistachio paste should contain nothing but pistachios.
Fragola (Strawberry) — No-Egg Version
For fruit gelato, skip the custard entirely. Blend 300g of ripe strawberries with 150g sugar until completely smooth. Mix with 300ml whole milk and 100ml heavy cream. Chill for 2 hours, then churn or freeze using the no-churn method. This style is lighter, more refreshing, and allows the fruit to speak for itself without any egg-based richness competing with it.
KNOW MORE: Flavors from another world: A journey through the most exotic ice creams on the plan

Six Common Mistakes and How to Avoid Them
Most problems with homemade gelato are traceable to one of these six errors. Knowing them in advance will prevent most first-batch failures:
- Overheating the custard. Above 85°C, egg proteins scramble. Keep the heat low and monitor continuously from 75°C onward.
- Not chilling the base long enough. A warm base poured into a machine will not churn properly and will produce large ice crystals. At least 4 hours in the fridge; overnight is strongly recommended.
- Skipping the tempering step. Pouring hot milk directly onto cold egg yolks creates scrambled eggs, not custard. Always add the hot liquid gradually while whisking.
- Freezing at too-low a temperature. Domestic freezers at -18°C make gelato rock-hard. Always rest it in the refrigerator for 10 to 15 minutes before scooping.
- Over-churning. When using a machine, check the gelato after 20 minutes. The correct endpoint is a thick, soft-serve consistency — not fully frozen. It continues to set in the freezer.
- Using low-quality ingredients. Gelato has a minimal ingredient list precisely because each element is fully visible in the final flavour. There is no way to hide substandard milk, mediocre chocolate, or inferior pistachio paste.
Best Practice: Keep a brief note of each batch — the date, the flavour, the fat ratio used, and any observations about texture or flavour. After three or four batches, patterns will emerge that let you fine-tune the recipe to your specific kitchen, your freezer’s temperature, and your taste preferences.
Your First Batch is the Beginning of a Better Understanding
Learning how to make gelato at home is one of those cooking experiences that permanently changes how you understand a food. What seemed like an exotic professional craft reveals itself as a set of learnable principles — fat ratios, temperature control, churning speed — that you can apply and refine over time.
The core takeaways from this guide are worth keeping in mind for every batch you make: less fat means more flavour; less air means more texture; temperature control at every stage determines the result. Get these right and everything else follows naturally.
Start with vanilla or chocolate — they give you the clearest read on technique before you introduce the variables of fruit or nut pastes. Make notes. Adjust. By the third batch, you will have a production process that is yours, calibrated to your kitchen and your taste. That is how every gelatiere started.
Frequently Asked Questions about How to Make Gelato at Home
How long does homemade gelato last in the freezer?
Homemade gelato is best consumed within 5 to 7 days of making it. Unlike commercial ice cream, which contains stabilisers that extend shelf life, artisan gelato begins to develop ice crystals and lose texture quality after the first week. Store it with plastic wrap pressed directly onto the surface to minimise ice crystal formation, and keep the container as full as possible to reduce air contact.
Can I make gelato without eggs?
Yes — fruit-based gelato (fragola, limone, lampone) traditionally uses no eggs at all. The base is simply milk, cream, sugar, and the fruit purée. For cream-based flavours like vanilla, pistachio, or hazelnut, eggs provide emulsification and richness that is difficult to replicate without them, though cornstarch-thickened versions are possible and work reasonably well. The egg-free fruit version is actually simpler and faster than the custard-based method.
What is the best ice cream machine for making gelato at home?
Any home ice cream machine with a churning speed control will work for gelato. The key specification to look for is the ability to churn slowly — gelato should be churned at a lower speed than ice cream to limit air incorporation. Machines in the 150 to 250 euro range from brands like Cuisinart, Kenwood, or Musso produce consistently good results for home use. The Musso Lussino is considered the gold standard for serious home production, though at a significantly higher price point.
Why does my homemade gelato go rock-hard in the freezer?
This is the most common issue with homemade gelato and the cause is almost always freezer temperature. Domestic freezers typically operate at -18°C, which is too cold for gelato. The solution is to rest the gelato in the refrigerator for 10 to 15 minutes before serving. If you want to address it at the recipe level, replace 20 to 30 percent of the white sugar with dextrose — dextrose has a lower freezing point and will keep the gelato softer even at -18°C.
Is it worth buying a gelato machine specifically, or will an ice cream machine work?
For home production, a standard ice cream machine works perfectly well for gelato. Dedicated gelato machines (like those used in professional gelaterias) churn at a lower speed and freeze at a more precise temperature, but the difference at home scale is marginal. A good home ice cream machine used correctly will produce results that are indistinguishable from a dedicated gelato machine at the home kitchen level.
How do I know when my gelato base is the right consistency before churning?
The classic test is the spoon coat test: dip a wooden spoon into the custard, lift it out, and drag your finger across the coated back of the spoon. If the line holds cleanly without the custard running back into it, the base is ready. Combined with the thermometer reading of 82 to 85°C, this gives you two independent confirmations that the custard has reached the right stage.
Can I add mix-ins like chocolate chips or nuts to homemade gelato?
Yes. Add any solid mix-ins (chopped chocolate, toasted hazelnuts, candied fruit) in the last 2 to 3 minutes of churning, or fold them in by hand just before transferring to the container for the final freeze. Adding them too early causes them to break down into the base rather than remaining as distinct pieces. For a stracciatella (chocolate chip) effect, drizzle melted dark chocolate in a thin stream through the machine’s opening in the last minute of churning — the cold base will shatter it into irregular shards.